- The AI Solopreneur
- Posts
- Automatic1111: Beginner's Guide
Automatic1111: Beginner's Guide
Let me prove you that It can save you tons of money in subscription
abhiram kandiyana
July 21, 2023
There are many tools online that let you generate images, edit them, create variations, and make videos out of them and they are readily accessible. But the problem is there are paid. yes, they have a free trial for some credits and all but if you want to continue using them, you need to pay some $$.
Today, I am going to share a tool suite that let’s do all types of editing in one place and the best thing is, It’s all free, for a lifetime.
I am talking about Automatic1111’s stable-diffusion web UI. All the details on its features models it supports, and the installation guide is here.
You can generate images, edit images(inpainting and outpainting), upscale images, and create videos out of other videos or images.
Now, I am going to show you how this one tool replaces at least 4 paid services for image/video editing also with instructions on how to use them. Let’s get started.
1. Image Generation from text - replacing MidJourney.
Once you have installed Automatic1111, set up everything, and were able to run the tool with the command ./webui.sh, this is what you will see at localhost:7860.

sd web-ui opens to this.
The leftmost tab says “text to img” where you can write a prompt and an image can be generated from it. Now, Automatic1111 UI already comes with 2 models but you can also add more if you want to.
I will briefly explain the important options here.
prompt ,negative prompt: prompt should be already known. it’s free-form text describing what you want to generate. negative prompt is what you don’t want in the image.
Now, If you want ideas on prompts, go to Civitai website. It’s like an Instagram for models. It has many generated images along with the prompts. Mind that you may not get the same images because the model may be different but you will get close results.
sampling method: it’s the sampler used for de-noising that generates a new sample at each step. Euler A is the fastest sampler. I also like DMP++ SDE.
sampling steps: The no of times the model samples before the final output. the higher this number, the slower it takes but the higher the quality of images.
Batch count: no of images you want to generate.
These are all you need to generate an image from text.
example: prompt “70s living room, 70s style, adding potted plants and trees, lots of plants, and using earthy tones and natural materials for the furniture and decor”
output:

That looks great. And I have not even used higher sampling steps. It took me around 30 sec to generate batch count 2. and I did it on my M1 Mac with no GPU.
2. Image editing - replacing Adobe Photoshop
Now, I can do many things to this image but to keep it simple, let’s outpaint it. meaning let’s extend the image to left and right. For this, we use the img2img tab.
After you generate your image in the text2img tab, there is a button below the image that says “send to img2img”. you can click that to use the same image.
this is a screenshot of my settings in img2img.

img2img settings
some new options here are:
Denoising strength: How creative you want the model to be. lower values will keep the changes close to the original image and very high values might edit parts of the image completely out of the scene. now, because in our case we need it to extend the image out of nothing, I gave it a higher value of 0.8
script: in script, I chose outpainting mk2 because I want to outpaint.
outpainting direction: because this is a room and we don’t want to outpaint the up and bottoms, I only selected left and right.
I left the remaining options to default.
This is the output:

outpainted output
Yes, I gave the denoising value too high and It made some changes within the image but, this looks better if you ask me.
Now, let’s do some inpainting. Inpainting is changing some parts inside the image. removing objects, changing objects, etc. I used the first image to be consistent.
In inpainting, you need to draw a mask on the image and you can give it a prompt and it will use the mask to edit the image. my settings for inpainting are
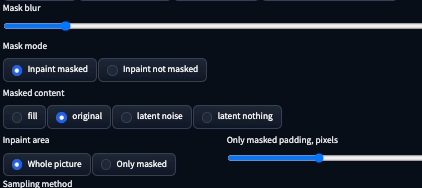
options I changed:
Mask mode: so if you want to change a small object in the image, you can draw on it and use “in paint masked” but if you want to replace everything else then you can use “in paint not masked”.
masked content: so, this is how to replace the part of the image you masked.
fill: will fill the mask with just some neighboring colors.
original: will generate objects based on neighboring pixels.
latent noise: will start with random noise and generate from there, can be very creative.
latent noise: will start with nothing, blank, and generate from there, I don’t know if this is useful.
inpaint area: what part of the image do you want the model to use are reference for generating.
Here are my outputs,
first, I wanted to put a television on the wall.


But then I thought. ok, there were no flat TVs in the 60’s. So, I changed it to a mirror.

that looks good. Now, I wanted to replace the pot on the table with a cup cause that makes more sense.

Now, this looks good. I played with a few other images.

His eyes, they are so … deep. let’s cover them up.

better!!
So, this throws adobe photoshop generative AI out of the room. Let’s go for the next one.
3. Upscaling images/videos - replacing topaz.ai
Now, you can also upscale images in Automatic1111 UI. There are a couple of ways to do it. One is just resizing the image, which is faster but not outstanding. It’s generally great if you just want to post it on social media, but I will do it the other way.
I used the “SD-Upscale” script with a Generative Adversarial Network(GAN) model.


Here are my settings for upscaling in Automatic1111.

These are the options I changed
Script: there are many scripts that we can use, like outpainting, inpainting, etc. I used SD upscale.
tile overlap:
You can also upscale videos but you need to convert the video into a zip file of images. (here). and just upload them as a batch and select the scale and click generate.
You can upscale to a really large scale but I recommend doing it repeatedly would be better. eg. , instead of upscaling with scale=4, first put scale=2 and then to the generated image , upscale again using upscale=2. That would give the model more information to use.
4. Image to video - replacing kaiber.ai
You can also generate a video out of an image. there are many settings for this so I recommend you watch this video to know how to do that.
Here’s my output.
I know It’s not much but I was lazy and used some random prompt and basic settings and ran it for 60 frames but you can make even better ones easily.
You can do all this, completely for free, as long as you want to, in just one tool. Isn’t that great?. and I just scratched the surface? I just spent a couple of minutes and generated some random images with changing the least amount of settings because I wanted to show you how powerful this is but you can spend a bit more time and do even more. There are many other extensions you can add. many new AI models can be used inside this tool. People are making careers out of Automatic1111 web UI(freelancing, youtube videos). and these are constantly updated every month or so with new features and extensions.
Yes, This takes a bit more time and effort to gain some experience. It’s not just one click output like these websites but that’s the beauty. It allows you to be creative and customize the outputs, models, and many more things.
Reply